Copyright
LBView copyright © 2014-2020 by Landbase Systems Corporation. All rights reserved.
This copy of LBView licensed to:
a) CenturyTel Service Group, LLC, a Louisiana limited liability company (“CenturyLink”) and
b) CenturyLink contractors for supporting CenturyLink operations only.
Other uses of this copy of LBView are prohibited.
Support
For technical support about using LBView contact CenturyLink at:
For additional information about using LBView for other purposes contact:
LBViewSales@LandbaseSystems.com
NOTE: This documentation is for LBView ‘Version 6’ – this version number is in the title bar of the LBView application:

Contents
To Install LBView Datasets (CenturyLink employees when connected to CenturyLink’s Intranet)
To Install LBView Datasets (Contractors and Manual dataset installation)
Automatic Update of LBView Datasets (CenturyLink employees when connected to CenturyLink’s Intranet)
LBView Application
The LBView application manages LBView Datasets. The LBView application creates a ‘local’ web server (‘intranet’) and then directs your browser to open a web page that references this local server.
This approach allows the LBView Data Viewer to run in many different browsers and have many different browser windows ‘open’ at the same time.
Installation
Step 1 – Install LBView Application
Locate the “LBView.msi” installer. Run the installer to install LBView.
Step 2 – Install LBView Dataset(s)
Note: The LBView installer (LBView.msi) does NOT include any datasets. You need to follow these steps to install LBView datasets.
See “To Install LBView Datasets” for instructions on how to install datasets.
To Open (View) a Dataset with Google Maps (CenturyLink Employees (when connected to the CenturyLink Intranet)
LBView datasets have been enabled to use Google Maps background images. You must be connected to the CenturyLink Intranet for this Google Map option to work.
NOTE: CenturyLink outside contractors can configure LBView to use Google Maps background when LBView is used and connected to the internet. Contact LBViewSupport@CenturyLink.com for more information.
Step 1 – Select the Google Map enabled Dataset to view.
Google Map-enabled datasets have ‘(GM)’ in their name. This ‘(GM)’ is a visual indication that you are connected to the CenturyLink Intranet.
See “To Install LBView Datasets” for instructions on how to install datasets.
First select the dataset to view:
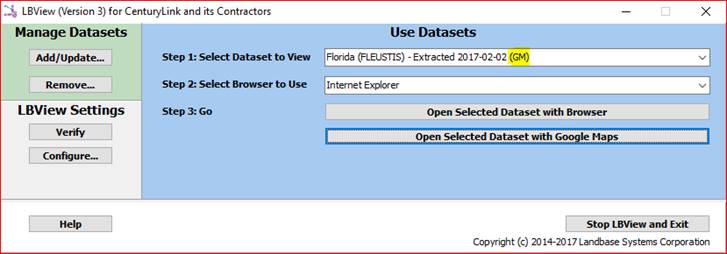
Step 2 – Select which installed browser you wish to use.
Select the browser you wish to use to view the dataset.
Step 3 – Select [Open Selected Dataset with Google Maps]
Select the [Open Selected Dataset with Google Maps] button to open this Google Map-enabled dataset with a Google Maps background.
Note that you must REMAIN attached to the CenturyLink Intranet for this Google Maps version to continue to work.
You can also select [Open Selected Dataset with Browser] to open the dataset without Google Maps.
To Open (View) a Dataset (non-CenturyLink employees or CenturyLink employees when not connected to the CenturyLink Intranet)
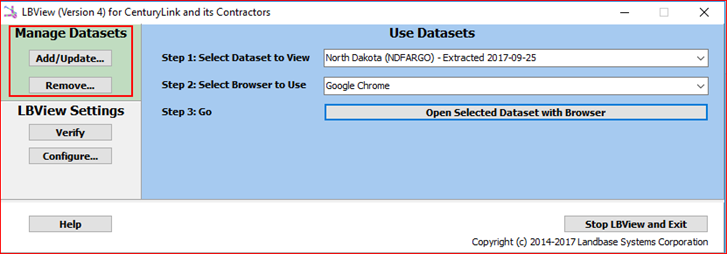
To open an LBView dataset follow the three steps highlighted by the red box below.

Step 1 – Select the Dataset to view.
Select the Dataset you wish to view.
See “To Install LBView Datasets” for instructions on how to install datasets.
Step 2 – Select which installed browser you wish to use.
Select the browser you wish to use to view the dataset.
Step 3 – Select [Open Selected Dataset with Browser] button
Select the [Open Selected Dataset with Browser] button to open the selected dataset with the selected browser.
Manage Datasets
Datasets contain the actual ‘map’ data displayed by LBView. You use the [Add/Update…] and [Remove…] buttons to manage Datasets.
To Install LBView Datasets (CenturyLink employees when connected to CenturyLink’s Intranet)
When you run LBView while connected to the CenturyLink Intranet, LBView manages the selection, downloading, and installation of LBView datasets.
Step 1: Ensure you are connected to the CenturyLink Intranet.
Step 2: Start LBView and select the [Add/Update…] button.
If you are connected to the CenturyLink Intranet you will see the following display:
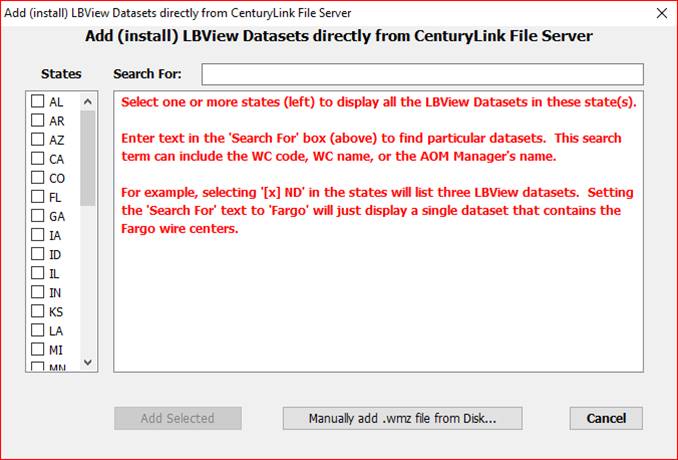
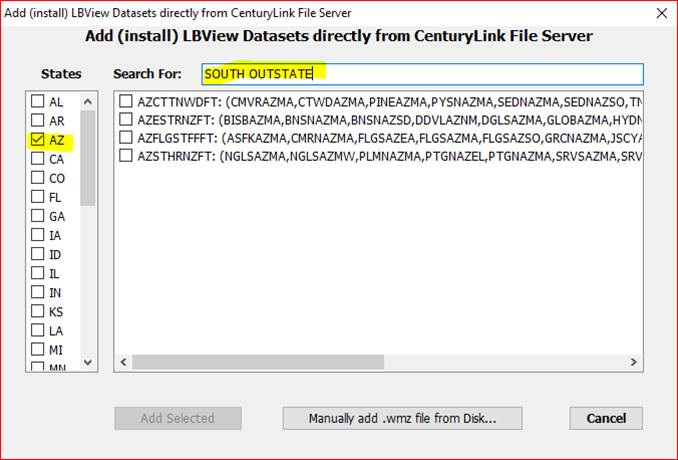
Step 3 – Select ‘one or more’ States of interest
Select ‘one or more’ states from the left-hand column. The system will display all LBView datasets from these state(s).
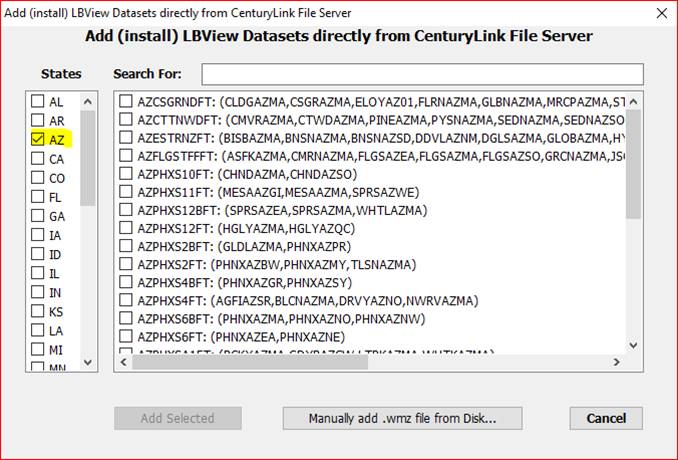
Step 4 (Optional) Use the “Search for” filter to find the desired Wire Centers.
You can filter the list of LBView datasets being displayed on the right-hand window by entering search terms. These search terms include:
· The name of the wire center
· The name of the AOM Manager
· The name of the AOM Area
For example, if you enter the AOM Area name “SOUTH OUTSTATE” for Arizona then the list of LBView datasets will be reduced to four datasets.
Step 5 – Select the LBView Dataset(s) of interest
Select (check) in the right-hand column the LBView datasets of interest.

Step 6 – Select [Add Selected] to download and install the selected dataset(s).
Select the [Add Selected] button to have LBView download and install the selected dataset(s).
 NOTE: You may also
use the [Manually add .wmz file from Disk…] button to select already-downloaded
.wmz datasets.
To Install LBView Datasets (Contractors and Manual dataset installation)
Note: The LBView installer (LBView.msi) does NOT include any datasets. You need to follow these steps to install LBView datasets.
Step 1: Download the required LBView Datasets (.wmz files)
This process is different for CenturyLink employees versus CenturyLink contractors:
For CenturyLink Employees (Field Technicians and other employees)
Browse to CenturyLink’s intranet site: http://gismaps/LB_viewer.html
Follow the instructions listed at this location.
Continue with Step 2 (below).
For CenturyLink Line Extenders and One Call Locators:
Your company point of contact will be provided with instructions to download new datasets as they become available.
Continue with Step 2.
Step 2: Start LBView (or, if running, make LBView the active program)
Step 3: Select the [Add/Update…] button to display the Open File Dialog.
Select the [Add/Update…] button in the Manage Datasets section. LBView will display the standard window’s File Open Dialog.
Navigate to and select the LBView Dataset(s) to install (the .wmz files). Then select the dialog’s [Open] button.
The program will display a report window summarizing the installation progress.

Select [Close] once the installation completes.
You may now use the installed dataset(s).
Note: Once installed the source .wmz file is no longer needed by LBView and you may delete the .wmz file from your computer.
Automatic Update of LBView Datasets (CenturyLink employees when connected to CenturyLink’s Intranet)
When connected to the CenturyLink Intranet, LBView will check your installed datasets against the currently available datasets and will display the list of updated.
Note: This check for updated datasets only occurs once a day.
You can ‘force’
this check to occur by holding down the ‘[Shift]’ key while starting LBView
Step 1: Start LBView
LBView automatically performs this check for new updates when it is started. If LBView finds that update(s) are available, then LBView asks if you would like to select the datasets you wish to update.
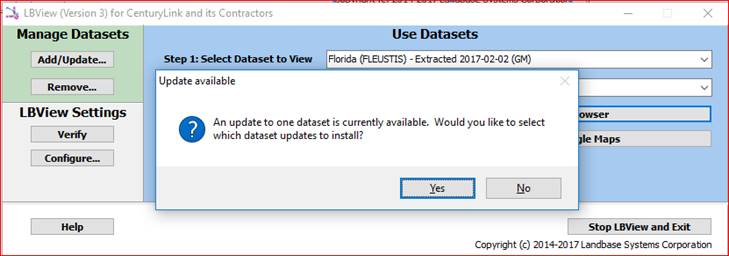
Select ‘[Yes]’ to see the list of datasets you wish to update.
Step 2: Select the updates to install:
From the displayed list of LBView datasets, select which dataset(s) you wish to update.
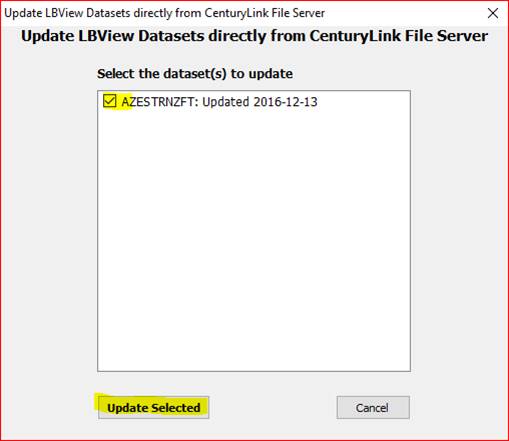
Step 3: Select [Update Selected] to download and install the dataset updates.
To Remove LBView Datasets
Datasets take up disk space. You may want to remove dataset(s) that you no longer use.
Step 1: Select [Remove…] button to display the “Remove (uninstall) LBView Datasets dialog.
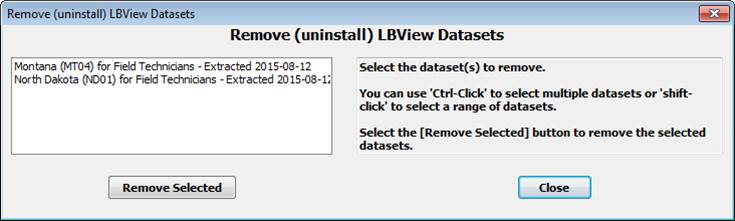
Step 2: Select
the Dataset(s) you wish to uninstall.
Step 3: Select
[Remove Selected]. Then select [Yes] at the confirmation prompt.
Select [Close] to close the Remove (uninstall) LBView Datasets dialog.
LBView Settings
Note: Most users will never need to use or adjust the LBView settings.
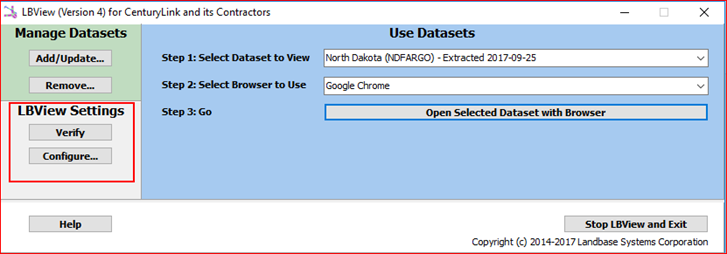
Verify
Select [Verify] to have LBView ‘audit’ the installed files, looking for missing or incomplete files and datasets.
The program will display a report of the installed (or perhaps ‘missing’) files.
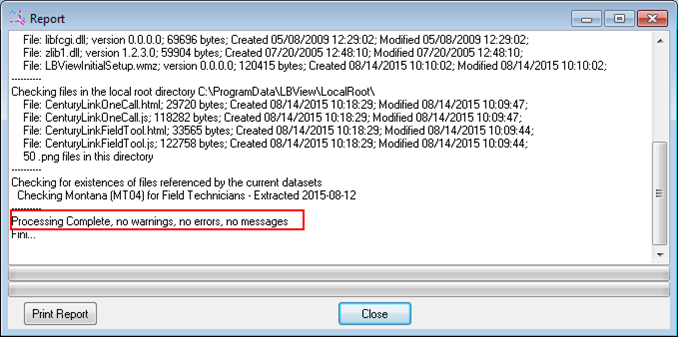
In general, if it reports “no warnings, no errors, no messages” then you should be able to use LBView. Otherwise you may need to reinstall LBView.
Configure…
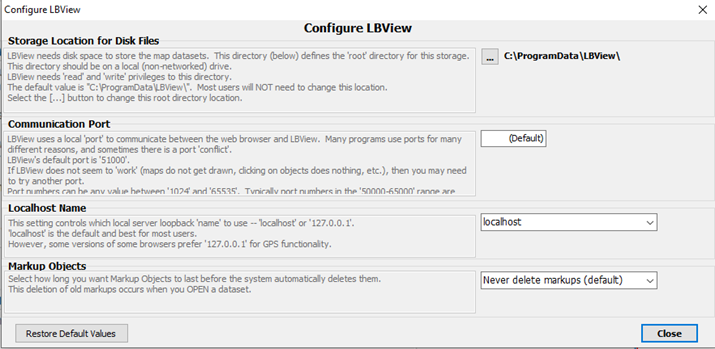
Select [Configure…] to CHANGE the default data directory for storing LBView Datasets and/or to change the local ‘port’ used by LBView. Most users will never need to change either of these values.
The Configure LBView dialog looks like:
Storage Location for Disk Files
The Storage Location for Disk Files controls where LBView stores its data files. This location is normally in “C:\ProgramData\LBView” (a normally hidden (but accessible) directory).
You can change this directory by selecting the  button and then navigating to the
desired location to store the LBView files.
NOTE: if you change the default data directory you will need to either:
1. Reinstall the LBView datasets, or
2. Manually copy/move the entire directory tree of files from the ‘original’ location to the new location.
Communication Port
LBView uses a single local ‘port’ to communicate with the browser. LBView’s default local port value is 51000.
You can change this communication port by entering a new value (between 1024 and 65535). Port values between 50000 and 65535 are ‘less likely’ to be used by other programs.
Enter a Port value of ‘0’ to restore the Communication Port to LBView’s default port value.
Markup Objects
By default, LBView does NOT delete markup objects. You can use this option to select how long markup objects will be kept.
You can change this deletion frequency by selecting the desired timeframe in the drop down menu.
NOTE: LBView checks the ‘age’ of all markup objects (and deletes older markups) only when the LBView program ‘starts’. If you leave LBView running for ‘days’ then the system will not check for older markups until you exit and restart LBView.
Resetting all values to their default values.
Select [Restore Default Values] to restore BOTH the Storage Location and the Communication Port to the default LBView values.
Help
Select [Help] to see this help file.
Directory Usage
LBView (the application) is installed in “C:\Program Files (x86)\LBView”.
By default the LBView data files are located in “C:\ProgramData\LBView”. Note that the “C:\ProgramData” directory is normally ‘hidden’ and does not list in the Windows Explorer. You can use the [Configure…] button to change the directory LBView uses to store the data files.
LBView temporary files are in the LBViewTmp” directory located in the Windows Temporary Directory. These files will be created as required.
Open Source Acknowledgements
LBView uses the following open source packages:
· curl.exe licensed under MIT/X license -- http://curl.haxx.se/docs/copyright.html
· Open Street Maps licensed under Open Data Commons Open Database License (ODbL) -- https://www.openstreetmap.org/copyright
· 7za.exe licensed under GNU/GPL license -- http://www.7-zip.org/license.txt
· zlib1.dll is licensed under a private disclaimer in the source code -- "Permission is granted to anyone to use this software for any purpose, including commercial applications, and to alter it and redistribute it freely,..."
· libfcgi.dll is licensed under a public disclaimer -- http://www.fastcgi.com/drupal/node/6?q=node/14
· tabutil.js is licensed under Apache 2.0 license --http://www.apache.org/licenses/LICENSE-2.0
· md5-min.js is licensed under the BSD '2 clause' License http://pajhome.org.uk/site/legal.html#bsdlicense